
1. Introduction
This tutorial is an overview of how I go about lighting my models or scenes in 3ds Max. It won't cover the whole gamut of lighting options in 3ds Max, but will instead focus on the lights that I most commonly use and the settings I use to get the most from them (version used 3DS Max 2012). My renderer of choice is mental ray and so the lights I use have settings that only work with mental ray, these being the area light settings. The lights in question, the mr area omni and mr area spotlight are perfectly usable as scanline lights though and most of the settings I use will carry over other than the area light functionality.
I will cover some basic lighting theory and show why I don’t use some of the default light settings in 3ds Max for this reason. I am no lighting tech though so don’t expect lots of physics jargon to back up everything I do!
Because I use mental ray I will also cover some rendering settings when working with final gather and GI as this is also paramount to getting the best from your lighting. But this is not a rendering tutorial so this will just be a brief look at best practice when using mental ray for rendering.
2. Mr Area Lights
So when you have loaded the Area_Lights_MR_Set-up.max file you will see four light set-ups, two with mr area omni lights and two with mr area spotlights. I will just explain a little about mr area lights in this section.
Basically the mr area lights are fairly identical to the default max omni and spotlights except where it comes to area settings and mental ray integration for GI (Global Illumination).
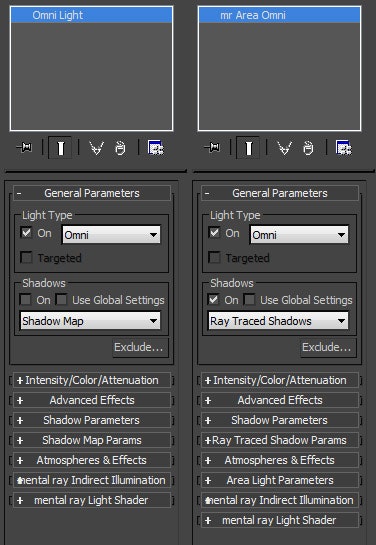
MR area lights are lights where you can set the area or size of the light so that it casts correct shadows for that respective area. The light itself does not behave any differently but just the shadow that it casts. To see the effects of an mr area lights shadow you must use ray traced shadows.
Mental ray shadow map
The mr area lights also have a further shadow type which is a mental ray shadow map. This is a useful shadow type to use when doing tests and animation for faster renders. It works the same way as the default shadow map but also has extra control for transparent shadows.
Area shadows
Also of note, mr area lights cannot use the “Area Shadows” setting. To clarify, this is one of the dropdown options under the Shadows tab, not the shadows produced under the Area Light Parameters tab. Mental ray does not support them and you will get an error message to that affect when you try and render with area shadows turned on. They can be used with standard mr and standard omnis and spotlights under scanline rendering mode. They basically simulate the same shadows as you would get from the area lights in mental ray for scanline. But are generally slower to render.
Area Light parameters
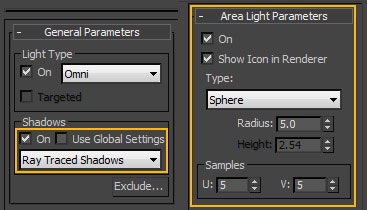
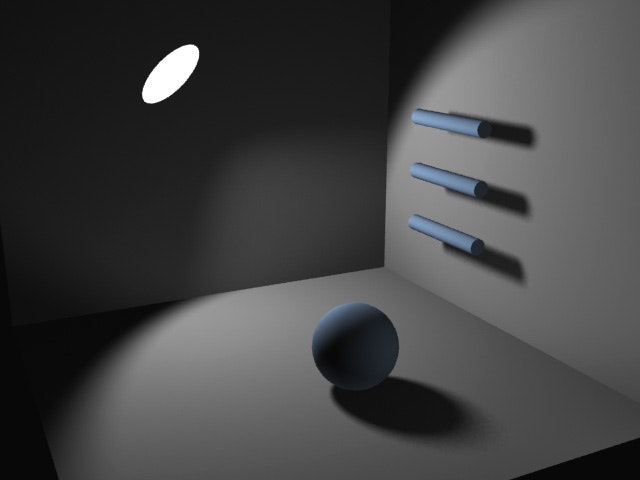
The area light controls for the mr area lights is found in it’s own section under Area Light Parameters, and as mentioned earlier, works in conjunction with the “Ray Traced Shadows” type. When you are setting up your renders I find it useful to show the light in the renderer, especially if I am trying to duplicate the light coming from a physical source e.g. a lightbulb.
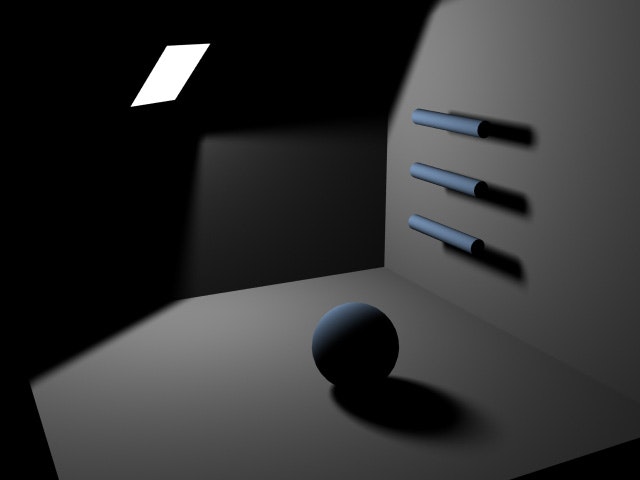
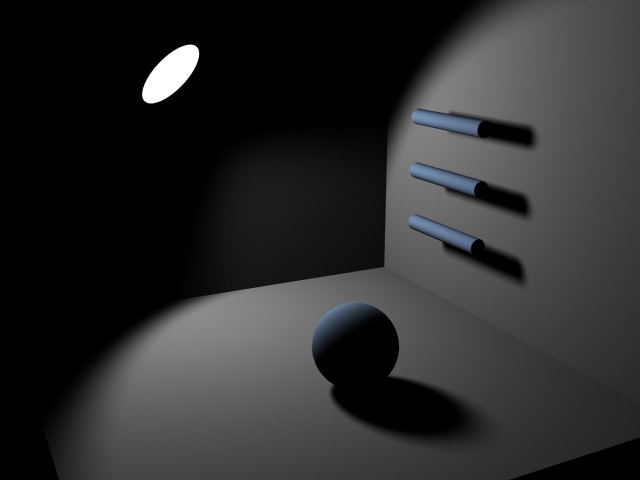
In the area light parameters there is a type dropdown menu. Here depending on whether you are using a mr area omni or mr area spotlight, the shape of the light can be chosen. The above image shows the default for an omni which is a sphere, but you can also choose a cylinder as the shape to emit light from. This can be useful for tube lights. With show icon in renderer turned on you can see the sphere in the renderer.
You can also see how the shadows are affected. They have a softer appearance. This is based off the radius setting for the sphere. This just sets the physical size of the light. As you can see, you are just given the radius setting when using the sphere type. If you choose the cylinder then the height spinner will become active. When using the spotlight, the types available are rectangle (default) and disc. You are given the height and width settings for the rectangle.
The last element to be aware of in the area light parameters are the samples. This is where you set the quality of the shadow. The u and v settings for example with the rectangular type would stand for the vertical and horizontal dimensions. When it comes to the 3d shapes then the u stands for the radial samples and the v for the angular subdivisions. Generally you will very rarely need to have a different number for both. A value of 5 is the default and is fine for most cases. You can use lower settings for test renders and if you want really good quality stills then the values can be set higher. These values can also be controlled from the renderer but I will get to that later.
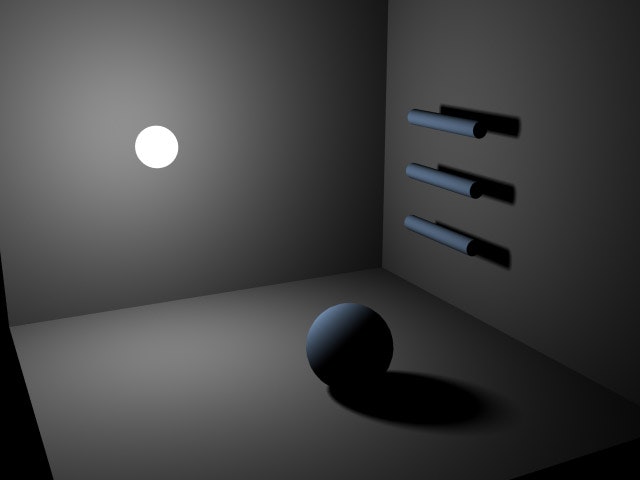
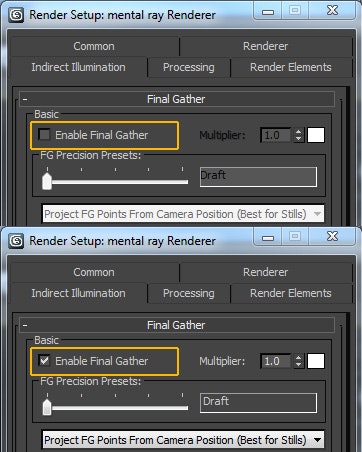
Important: Make sure you are using the mental ray renderer and have turned off Final Gather under the Indirect Illumination tab. We just want to look at the effect of the light without any ambient for now.
Attenuation settings
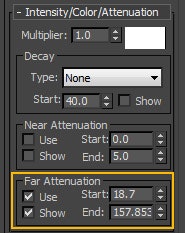
As you can see from the render the light has a falloff. This is set in the Intensity/Color/Attenuation tab using the near and far attenuation inputs. I usually only use the far attenuation settings. The near attenuation works by fading in to the light’s multiplier value, being zero until it hits the start value and up to the full amount at the end.
The far attenuation is just the light’s falloff value, the start being where the full multiplier value starts fading to zero at the end setting. The reason to use falloff is to simulate the inverse square law of light’s loss of intensity over distance. Or for you physics heads it states that a specified physical quantity or strength is inversely proportional to the square of the distance from the source of that physical quantity or strength. All you need to know is that light fades over distance and that you can control this with the attenuation values and this gives a more realistic look to your renders.
The default decay (falloff) type is set to None. This means that the shadow will falloff in a linear fashion between the start and end inputs you set for the near and far attenuation. If you really want to use a physically correct inverse square falloff you can set it in the decay type dropdown menu. You can experiment with both inverse and inverse square. The result is a more extreme falloff of light intensity from the source, and will yield a more realistic result.
With sunlight on the other hand you can almost ignore decay (use very little, depending on cloud cover, weather etc) but we’ll leave that for later, for all other lights use attenuation/falloff decay. So you could if you really needed too, calculate the physically correct falloff of whatever light you are using, based on its real world values, Kelvin etc.
But if you are just going for something that “looks nice” then try whatever looks good to you!
Basically using a bit of common sense, e.g. a very bright light source will carry further than a dull one and you will come up with something that looks right.
Spotlight Parameters
Spotlights are targeted lights so your light is pointing in a direction that you specify. The default spotlight will be targeted, meaning it is created with a little box (target node) which acts as the “look at” point for the light, but you can turn this off if you wish (Targeted check box under Light Type).
The spotlight also has its own parameters section. The main things to take into account here are the hotspot/beam and falloff settings. These are fairly straightforward, just think of it as two cones, the inner one being the full brightness (Hotspot) of the spotlight and the outer being the penumbra or falloff, the outer edge of which the light falls off to zero. You can also set whether the beam is from a circle or rectangle. This is useful to use in conjunction with the area light type of either a disc or rectangle.
If you use the rectangle beam then you can set the aspect. This is just the aspect ratio of the rectangular beam. 1 being a 1:1 aspect. A value of 1.333 would be a 4:3 ratio etc. If you want to find the real value relative to 1 then you can use the image aspect in the output size inside the render set-up dialog. The only thing to note is that the rectangular and circle beam of the spotlight will not change with the change in the size of the area light. You can fake the starting shape of the beam to fit the area light size using the near attenuation settings.
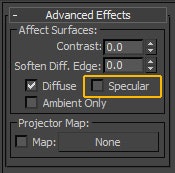
Advanced Effects
It’s worth noting a couple of things in the advanced effects tab. You will very rarely use these controls but if you are setting up lights that you want to use as fill lights then it comes in handy. You can control whether the light affects diffuse, specular or set it to be an ambient only. If you are using lights as fill lights that are simulating bounce lights then you would not want them to affect the specular of your objects. So you can turn off the tick box for specular.
The contrast setting can sharpen the transition area between light and shade but it will also affect the entire scene, upping the overall contrast in the scene.
If you want to have your light project a map, or work similar to how gobos work on real spotlights, you can input a map in the projector map area. Black and white maps work best but you can project any map type, or movie if you like.
3. Lighting Set-Ups
I am just going to outline a few set-ups for lighting scenes in which you use fill lights (No GI) and then final gather and GI for bounce light.
Basically there is only the one main key light in each of the previous example images. With all 3d renderers, the default (only in scanline mode now) is that there is no bounced light. So with this one key light there is no light on the shadow side of the objects (no bounce from the surrounding lit surface). If there is no ambient value set in the scene (Rendering/Environment/Global Lighting/Ambient) then any unlit area is just pitch black. This can work for indoor (no windows) nightime scenes where most lights are not powerful enough to create much meaningful bounce light. It’s also useful for faster rendering times but generally doesn’t give a very realistic look and should be avoided.
Most cases will require some bounced light off the surfaces that the light has hit. So there are a couple of ways of going about it. If you are still very concerned about rendering times and want fast results, then avoiding Global Illumination solutions will be your best bet at the expense of realistic and sometimes quality results.
In 3DS Max scanline mode you have Light Tracer and Radiosity solutions which deal with GI. But Light Tracer is very slow especially when you dial up the quality settings, and Radiosity needs good mesh sub-division to work well. So I will skip these, you can look them up in the max help if you like, but I generally avoid them and use mental ray.
So without using GI, I just setup lights in certain positions to illuminate the shaded areas of the scene. These are usually called fill lights. As mentioned previously I turn off their ability to affect specular and also I turn off their shadow casting. You should also set their multiplier and attenuation values quite low as they are just representing what little light has been reflected back off the lit surfaces. Basically the more powerful the key light though the more powerful the bounce light. It does also depend on the materials, as each material, wood, plastic, metal etc will absorb and reflect light differently. But it comes down to what looks right for your purposes. If you want realistic results then looking into the reflective qualities of these materials is recommended (If using standard shaders). The Arch and Design Mental Ray shader has many presets for these materials “out of the box”.
So a good set-up for these small box room scenes is to create a light for each wall of the box. The set-up will also depend on which light you’re using. If you’re using an omni, since the light is emitting in all directions then it will hit all the surfaces of the box and therefore a light can be used for each wall. Since you have turned off shadow casting for these lights they can be placed behind the walls (also make sure force 2 sided is off – Render Setup/Common tab, under Options). Because you only need the light from the wall they can all be targeted lights. They should all use falloff so you can have greater control over their strength.
If you are using a targeted key light, then a couple of well placed fills should do, one from underneath to simulate a little bounce from the floor and one behind and basically opposite to the key. Like I said earlier, these lights should have low multiplier values and also apart from not casting shadows or affecting specular you may want to exclude them from affecting other objects, in this case the floor and walls, which goes for the omni example above.
Now these examples have just used lights to act as bounced light and this can only be taken so far. It’s basically a cheat and it does carry well over into real-time use because it’s quick. But since we’re using a renderer like mental ray we might as well use its full potential.
Final Gather
So now I’ll introduce final gather. This is a GI solution that simulates light bouncing between objects. There is also GI in mental ray but this works by sending out photons from the light source which then bounce around the scene. We’ll just deal with Final Gather now. Final Gather is on by default in mental ray. I have turned it off for the previous examples. To turn it back on you can either do so in the render setup/ Indirect Illumination tab/ Final Gather or when you do a render there is a render settings tab below the render with a few dials. You can turn on the final gather under the final gather precision dial.
Right, once you’ve turned final gather back on, if you render the scene it won’t look much different. But if you closely compare the renders with and without final gather you will notice the final gather scene is slightly brighter, but it’s tough to see.
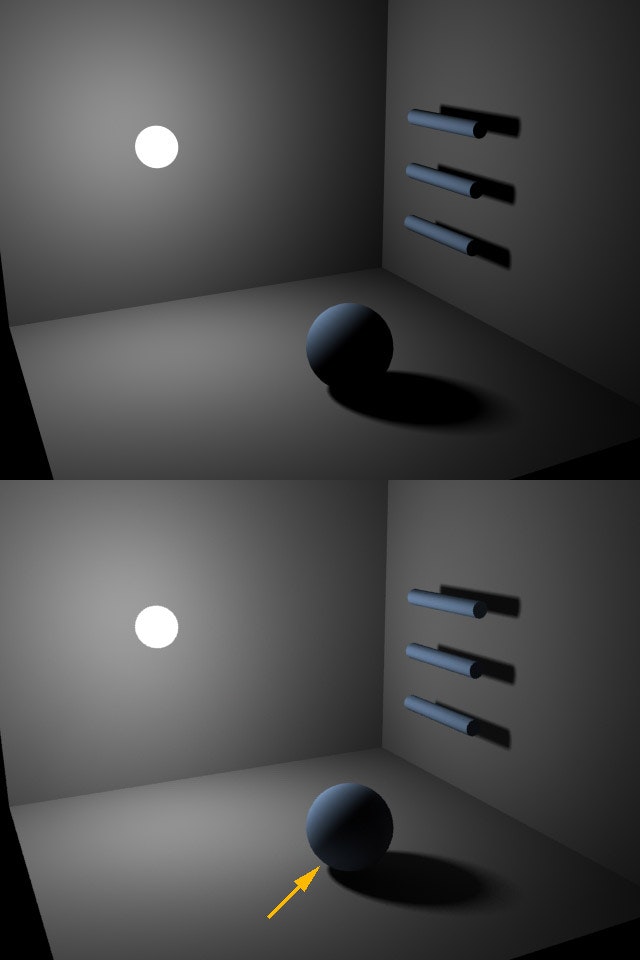
I’ve used an arrow to point out just one area where you can see light is bouncing onto the sphere. There is not much light intensity in this scene for the final gather to work with so it’s a very subtle effect. But if you want to push the effect a little you can specify more bounces. You can do so in the Indirect Illumination/Final Gather/Basic area. At the bottom you will see a diffuse bounces spinner. But this will not give you the result you might expect. Because as I said the key light is low intensity then even with several more bounces there is not enough energy to transfer between objects. With a value of 3 bounces you will get the following. As you can see there is virtually no difference between this image and the one with no bounces.
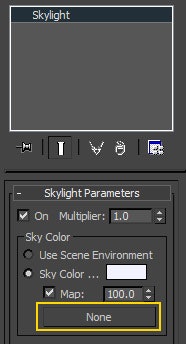
Final gather does struggle to work with the standard lights so it needs a helping hand, so here’s where we introduce an ambient light source, the skylight.
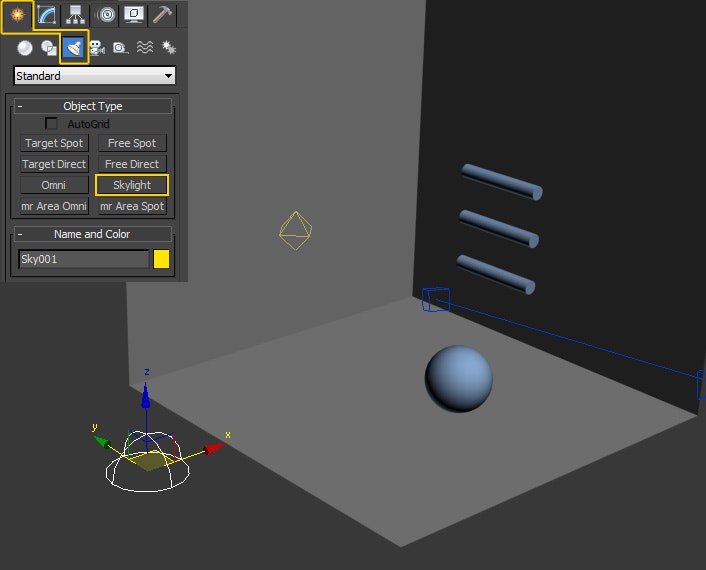
Skylight
Usually this is used to simulate the light from the hemisphere of the visible sky, hence the name, clever that. But it can be used to boost the effect of final gather for rendering your meshes in similar setups to this (mostly for outdoor scenes though). This does require some set-up though, if you had a completely enclosed room then the skylight would not penetrate the mesh, so you will have to contrive the situation a little. In this max scene you can see that there are no physical walls for the room on 3 sides. If your scene was enclosed within a box you would not get any light from a skylight.
So add a skylight to the scene from the standard lights/skylight. You can place a skylight anywhere in a scene, the skylight icon is just that, an icon and just represents the fact that you have turned on light from a spherical source in the environment. So don’t worry about where you place it.
You can even rotate the icon in any axis and it won’t make a difference because it is basically a spherical source.
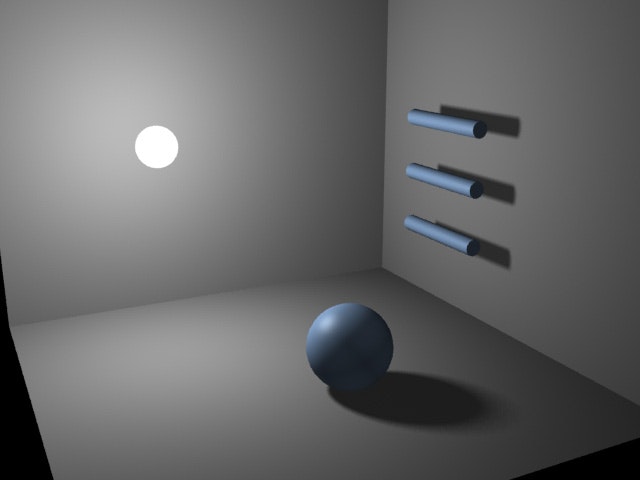
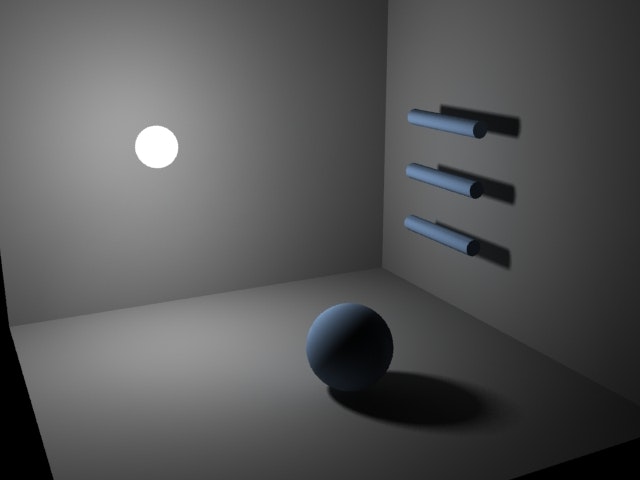
Leave the default settings for now and give the scene a render. You will get the following.
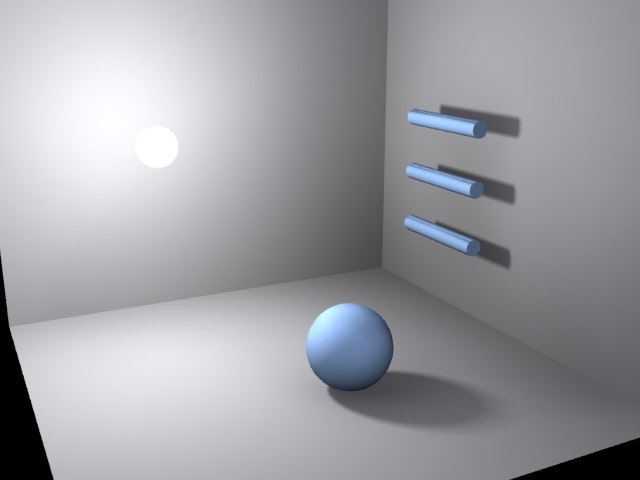
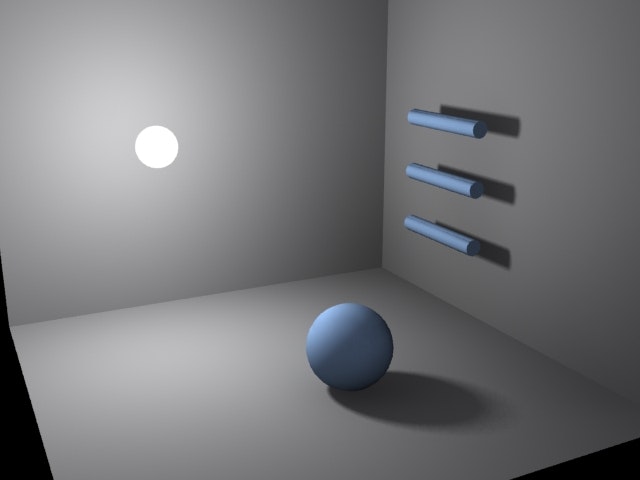
As you can see, there is now a lot of extra light and this is all thanks to the skylight bouncing more light around. If you now turn the bounces up to a value of 3, you can see the results more clearly.
But we now have a very bright area around the key omni light. The wall and floor are burning out and this is not the effect we want. You want to avoid this in your renders generally because you can add in strong contrast, light burn, saturation etc in post, like Photoshop where you have more control. So you want your renders to have more even mid range light values. Obviously this depends on the effect you are going for, you may want strong contrast in your scene but this still does not mean you need to burn out areas and loose detail. You just need to balance the light values carefully.
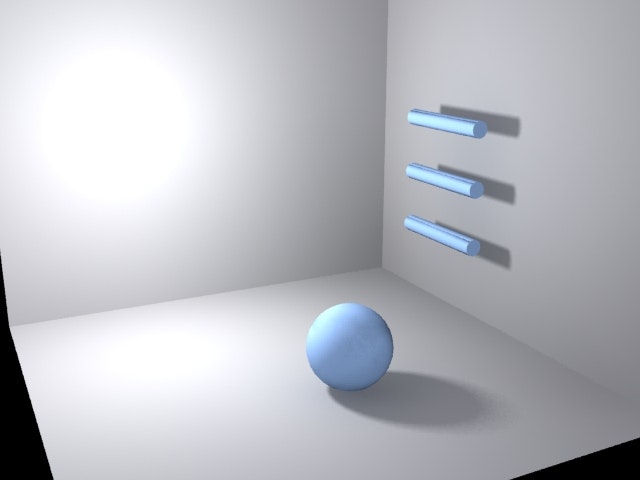
So if we adjust the skylights multiplier value and reduce it we can balance the light values. If I turn the skylight’s multiplier down to 0.5 and we turn off bounces again we will get the following.
This is now more evenly balanced and it’s an image you can do more with in photoshop if you want to add bloom or further contrast without losing detail (preferably saved in a 32 bit image format, tiff, tga, png etc otherwise with stronger contrast you may encounter banding issues).
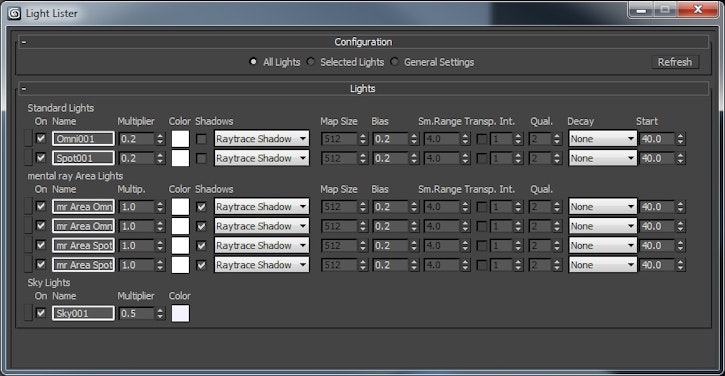
Light Lister
If you have many lights in the scene and you don’t want to have to keep searching them out to change their values in the modify panel you can use the light lister. This is a dialog box that carries a list of all the lights in the scene and their values for multiplier, shadows etc. You can select the lights you want here, turn them on and off and also adjust their attenuation/falloff values.
You can find the light lister under Tools/Light Lister.
By default the light lister does not have a keyboard shortcut. But you can set one up yourself if you wish in Customize/Customize User Interface. Find light lister in the list of commands, input the keyboard shortcut you want in the hotkey dialog box and click save. I use shift/ctrl + L myself.
HDRI
Hdri stands for high dynamic range imagery. Basically it’s an image format that can hold several levels of exposure in one image.
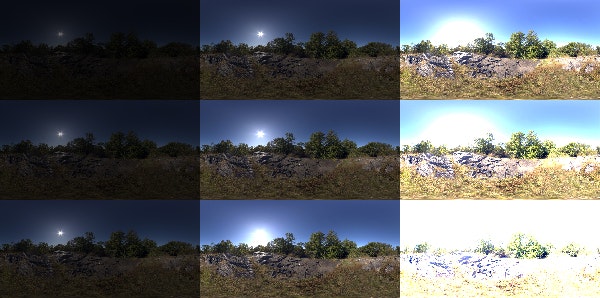
For my renders I use HDRI images for reflections and I also input the HDRI image into my skylight so I can get the same coloured light values to match the reflections. You can plug any image into your skylights map slot, not just HDRI images. Even animations if you wish.
The advantage of HDRI images is that they will match the exposure of your renders no matter how high or low you end up setting your light values because the HDRI image contains that high range of exposure within it.
This is most noticeable when you are using the HDRI image for your backdrop or glossy reflections and of course when you are actually using exposure control. A standard 8bit image would burn out or start banding badly at high exposures and just not be visible at low exposures. It might not be as noticeable when used in the skylights map slot but it still makes a difference.
I won’t go into the exposure control now though, suffice to say, when using the daylight system in max or photometric lights, it will come in very handy and you will most likely have to use it.
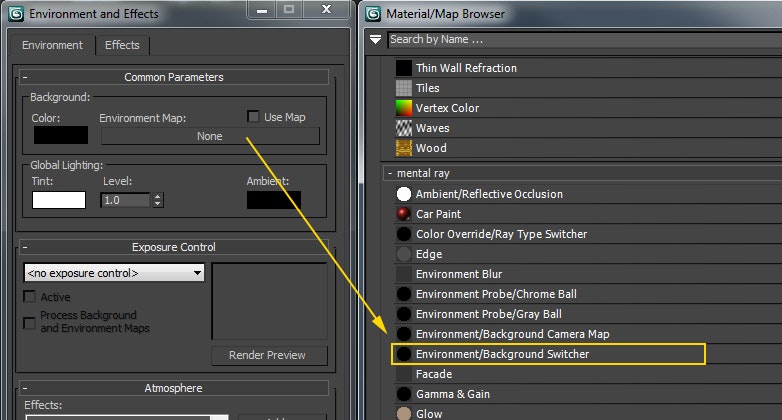
To use HDRI images for objects in the scene to use as a reflection, you put it in the environment map slot in the environments and effects dialog. You get to it through the Rendering/Environment…
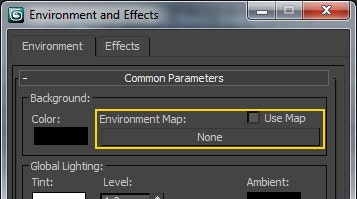
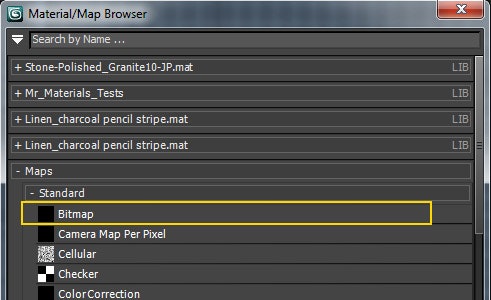
Click on the none button and the material map browser comes up. The HDRI map is a bitmap so double click the bitmap slot to browse to the HDRI map you want to use.
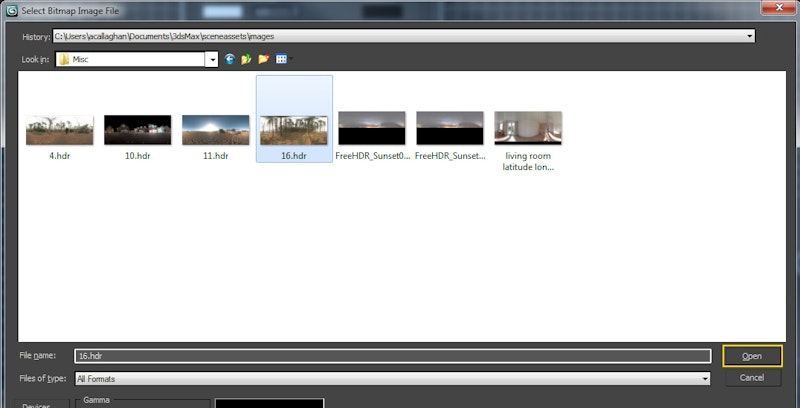
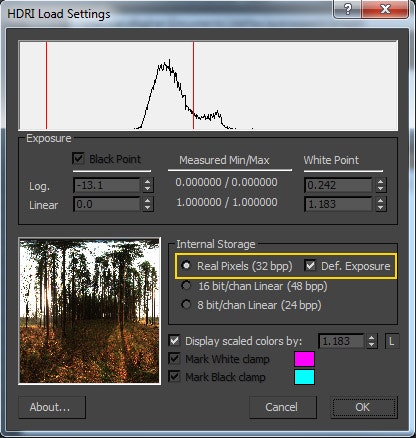
When you open the HDRI image you will get a HDRI Load Settings dialog. All you need to do here is make sure you choose Real Pixels (32bpp) and tick the Def. Exposure box. As below.
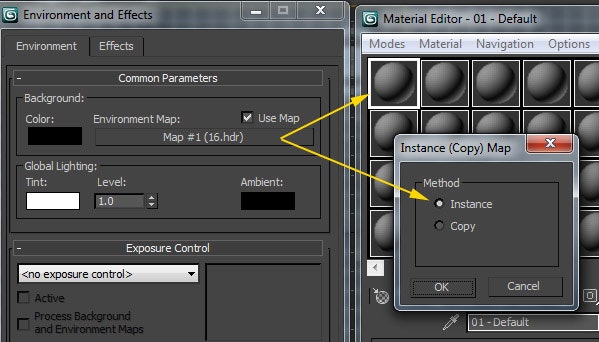
Once the map is loaded, you should copy an instance of this map to the material editor so you can apply a few settings required to make this a proper spherical environment map.
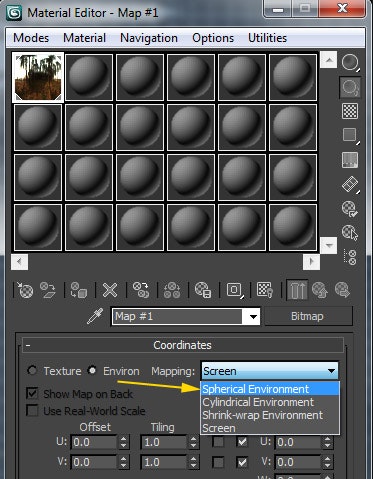
So when the map is copied to the material editor you will see that in the material’s coordinates tab the Environ mapping dropdown is set to screen. This is the default but we want to have our map act as a spherical source, as most HDRI images are originally captured from a chrome sphere. So in the mapping dropdown choose spherical environment.
Now that’s the reflection sorted, we can now look at having the scene be lit by an HDRI image by putting either this HDRI or a smaller version in the skylight’s map slot.
You don’t require a very large and detailed map for the lighting data. So you can save memory by creating a smaller version of the HDRI map you are using for the reflection. Usually HDRI maps are from about 4k (4000 pixels) all the way up to 10k and beyond.
You can re-size the HDRI maps in photoshop and also add a blur, which helps to make the lighting more regular.
Once you’ve done this, load your HDRI into the skylights map slot.
If this is a new re-scaled map and not just an instance of the environment HDRI, then you must copy an instance of this map into the material editor also so that you can set it’s environ settings to spherical environment .
You can experiment by rendering your scenes with and without the HDRI in the skylight’s map slot to realize the difference it makes to the scenes lighting. Basically the lighting will tie in a lot better with the HDRI you placed in the environment.
Background Switcher
If for some reason, you do not wish to see the environment HDRI map in the background when you render, but would rather have a black background or another image then you can use a background switcher shader.
This shader only works with mental ray. When you click on the map slot in Rendering/Environments… and scroll down the list in the material map browser you will come to a mental ray tab. There are a few Environment shaders but the one we are looking for is the Environment/Background Switcher.
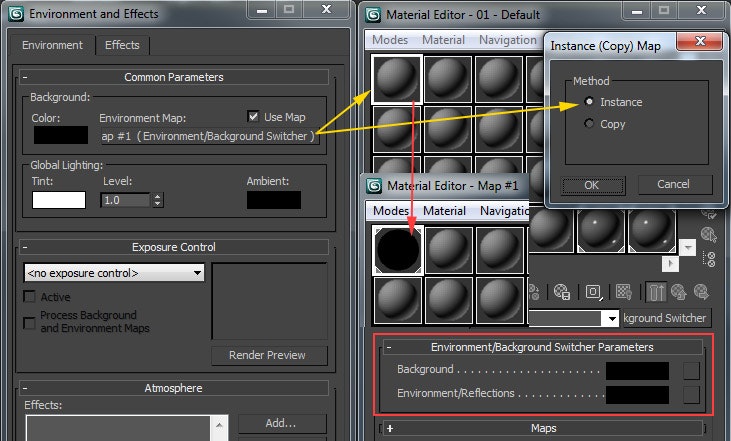
So it’s a very straightforward shader. Put whatever you would like to see in the background when you render in the background slot and whatever you want to use for reflections e.g. an HDRI map in the Environment/Reflections slot. Any objects with reflection in your scene will only use the map in the Environment/Reflections slot.
Conclusions
So, this is enough to get started with. Of course I would recommend checking out the max help files if you want to learn more about the other light types. Using the online Gnomon tutorials you can find some really useful mental ray lighting and material knowledge also and through CG Society and other 3D Blogs.
Anthony Callaghan
Anthony Callaghan is Lead Modeller on Doc McStuffins
http://anthonycallaghan.blogspot.ie/
We Love Animation®
Brown Bag Labs is an exciting online space, brought to you by Brown Bag Films. We share great content for families as well as behind the scenes fun and tutorials from the Brown Bag Films team.
Get our great newsletter!
Get our great newsletter!