
The Making Of The Last Elk Sculpture
- Behind the Scenes
- Watch Now
- Tutorials
- Kids & Families
- Posted by Anahita Tabarsi on November 23 2016
Share Tweet
Art Lead Seán Forsyth delves back through the years with us to one of Brown Bag's very first 2D animated short films - The Last Elk - as he details the process in taking the original 2d concept character and bringing it to life in 3d as a limited edition bronze sculpture!
Check out the process below:
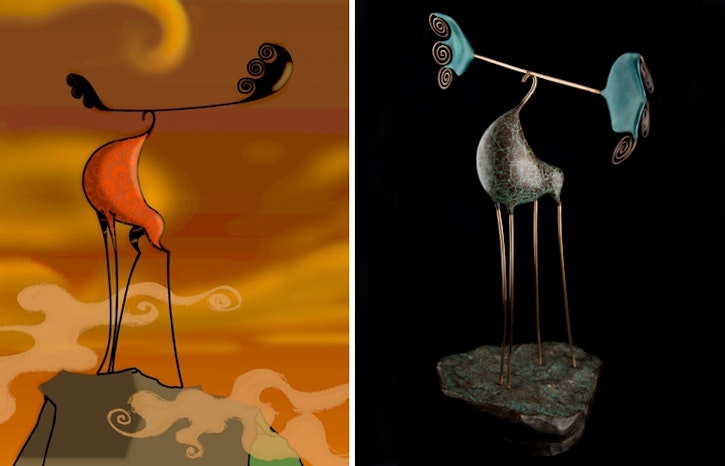
Seán: The Last Elk is an award-winning animated short film which was created by Brown Bag Films back in 1998. Now extinct, The Irish Elk (Megaloceros Giganteus) was the largest deer that ever lived. They first appeared about 400,000 years ago in Europe and Central Asia and the last Elk in Ireland died around 11,000 years ago.
Standing over 2 metres tall and carrying the largest antlers of any known deer, these giant Elk roamed Europe and have inspired artists for centuries, from cave paintings in Lascaux to short animated films.
Various theories have suggested the cause of its extinction and in Brown Bag’s short animated film it was man who killed the last Irish Elk.
The bronze sculpture is a unique piece of art that has been a collaboration between myself and Brown Bag Films' Co-founder Cathal Gaffney, based on designs from the short animated film.
Cathal decided to make a limited edition of nine sculptures of the Elk to be cast in bronze, and knowing that I had recently been doing some bronze artwork in my free time, he asked me to make it.
Naturally, I jumped at the chance! I've been sculpting for a little while now at home, using both clay and stone, and thought this would be an excellent opportunity to try to bring the day-to-day digital sculpting I do at work into the mix. So I studied the original 2d animation and set to work sculpting it in 3d in ZBrush.
This wasn't a particularly difficult sculpture to make, the original 2d design is wonderful and so it was simply a case of re-interpreting that in 3d and keeping as true to it as possible, keeping the elegant lines and flow of the figure.
As it would ultimately end up as bronze, I applied a bronze shader and a colour combination of yellow and green in order to visualise the final piece.
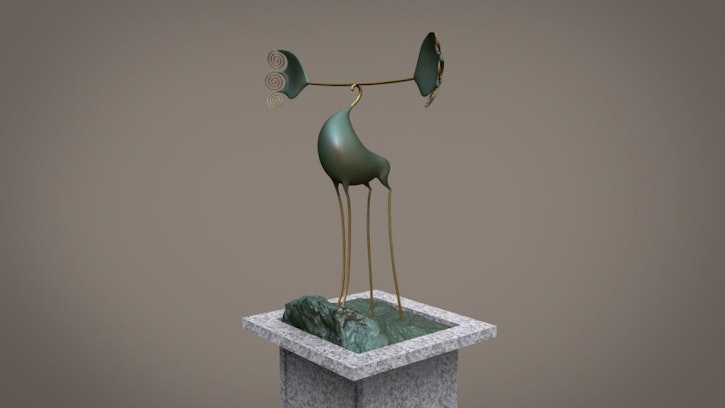
I made a turnaround of the final sculpture in ZBrush as a proof of concept and a way of checking that everything worked visually.
There are various stages to producing a sculpture such as this and traditionally, the original sculpture would have been sculpted in clay and moulds would have been made from that. However, we saw this as a chance to utilise the digital tools at hand as much as possible to create the final piece so we decided to 3D print the various elements of the sculpture and then cast the 3D prints.
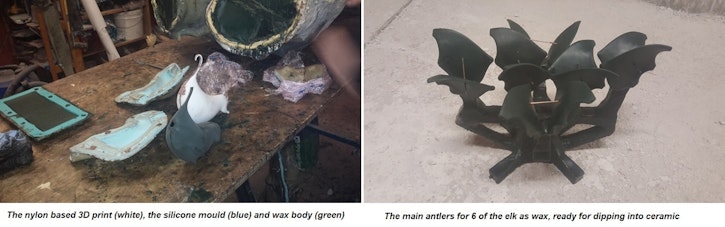
Once these elements were in place and the wax copies had either been printed or cast, it was time to create the ceramic shell which would ultimately hold the bronze pour. After the wax model has been checked and touched up if necessary, a system of sprues and risers is attached. The sprues and risers provide an entrance for the molten metal and serve as exits for the escaping air. The wax pieces are then each dipped in a ceramic coating, which is allowed to dry, before the next coat is applied. Each coat takes 4 hours or so to dry, and there needed to be 9 dips in order to build up a thick enough shell around the wax to be strong enough to take the bronze pour.
These wax models all had wax sprues bound to them before the dipping process, which serve as channels for the bronze to pour into the final ceramic shell. The complete wax structure encased in the ceramic shell is then heated in a kiln until the wax runs out and all free moisture is removed. The investment is then filled with molten bronze. The removal of all wax and moisture prevents the liquid metal from being explosively ejected from the mould by steam and vapour - a very important step! Once the wax has been melted out, it can be reused in the next sculpture. The shell is now ready to receive the bronze pour.
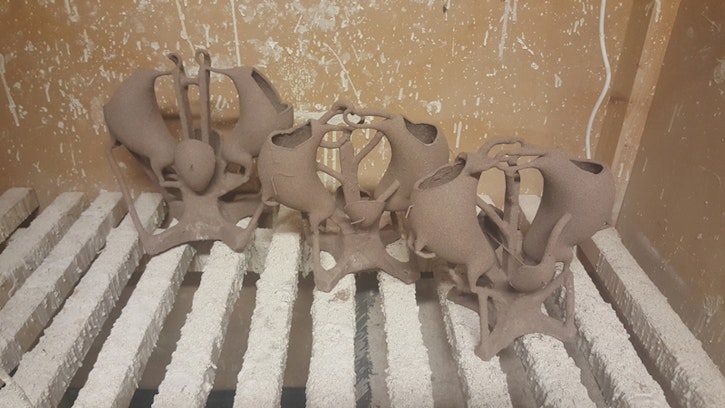
A cauldron of metal is melted down and the ceramic shell is put into a sand pit for the pour. The bronze is heated up to around 1,200 degrees Celsius and the molten metal is poured into the ceramic shells. The air escapes through the vents and the cast piece then has to cool down gradually. Once the bronze has hardened, it's only a short while later that the bronze will have cooled down sufficiently to crack open the ceramic shell and expose the metal inside.
After the bronze has been released from the shell via hammers and sandblasters, the sprues (now metal) used to pour the bronze into the shell have to be cut away and filed down. The chest piece had to be rewelded onto the body and each piece of the sculpture now had to be sanded down and polished up to the level of the final piece.
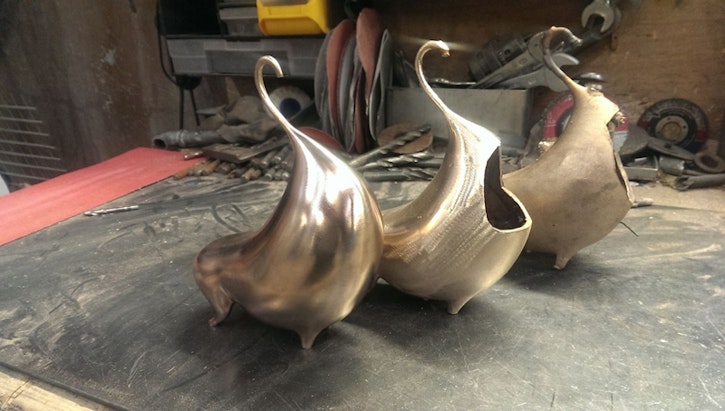
Once this was done, various elements were ready to be reassembled and welded together. At no point up until now had the sculpture been seen other than on a computer screen, so this was an exciting moment!
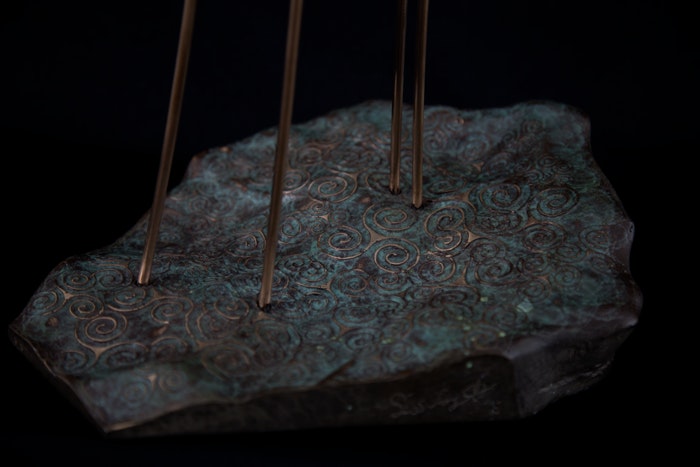
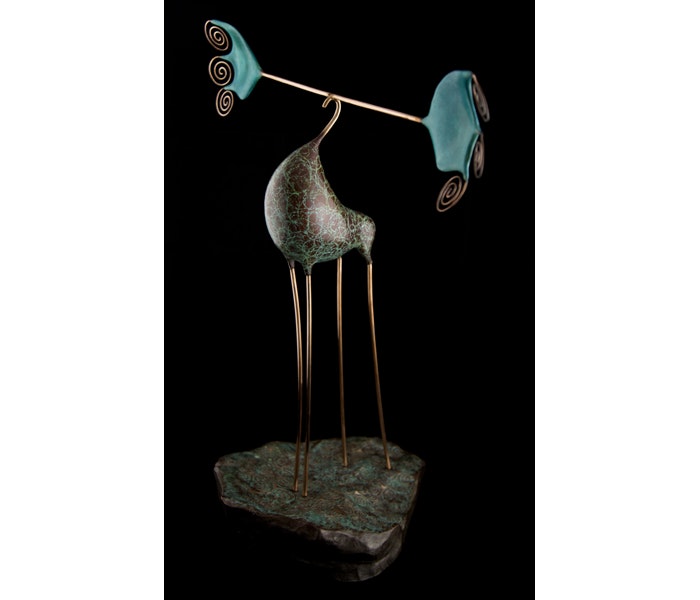
The pieces were assembled by “tacking” or spot welding them on. We wanted to keep the idea from the original animation of him standing on a precipice, so I experimented with different looks of carved rock for the base. The spiral motif had been a strong element in the animation and it felt right to incorporate it into the base.
As we had the advantage of 3D printing this base, we could afford to try something that would have been difficult to do by traditional means, making extrusions on the base, rather than imprinting them via a stencil. The effect was pleasing to the eye and felt right. The idea was to have the base have a green colour and polish up the spirals to produce highlights to help make them pop from the base.
To obtain the final finish, the process of applied patination is used to distress the bronze surface and yield green and brown hues. There are a host of chemicals available nowadays to control the colour desired for the final piece. Once the colours are chosen, the relevant chemical is then applied to the bronze. For bronze, exposure to chlorides leads to green, while sulfur compounds tend to brown. This is done by applying heat to an area and then applying the chemical via a brush, dabbing it on and letting it burn onto the surface. This is a stage where we work closely with the patinator to get the desired result.
For anyone interested in the specific chemical breakdowns and formulas, there's an excellent website on the subject here: Patina Formulas for Brass, Bronze and Copper
After the patination is done the pieces are then finally sealed in a protective clear wax. Here you have the final result of all our efforts:
Of the nine sculptures produced, just five are available for sale!
For more details on these, please visit: www.thelastelk.com
Anahita Tabarsi
Anahita is Brown Bag Films' Marketing Director, Digital & Social and drinks more than five coffees a day...
We Love Animation®
Brown Bag Labs is an exciting online space, brought to you by Brown Bag Films. We share great content for families as well as behind the scenes fun and tutorials from the Brown Bag Films team.
Get our great newsletter!
Get our great newsletter!