
Welcome to Part 2 of the Flash Animation Tutorial, in case you missed it you can check out what we covered in Part 1 here. In this tutorial, I will be covering more about symbols. Firstly, I will recap a little and delve further into Tweening and follow it with Advanced Symbols and introduce instancing. This is a boring bit I won’t lie but if you get to grips and become comfortable with these concepts and techniques it will help you phenomenally in the next tutorial where I will get stuck into characters and get started on a walk cycle.
Advanced Symbols 1.
Easing
We left off from our last Tutorial by creating a “tween” between two keyframes. Using this same set up I’ll explain easing. Easing in and Easing out are the terms used when creating an animation where you would like the action to either start slow, then speed up or start quickly then come to a slow cushioned stop. See the gifs below for a visual explanation
(fig. a) Ease in:

(fig. b) Ease out:

The way to add easing to your animation is quite simple: Click anywhere in the blue area of your tweened Animation. On the right hand side of your interface you will see the properties panel. Once your tween has been selected you will notice a new sub-panel in the properties panel labelled Tweening. (See image below) If you can’t see the properties panel, at the top of the interface go to windows – properties.
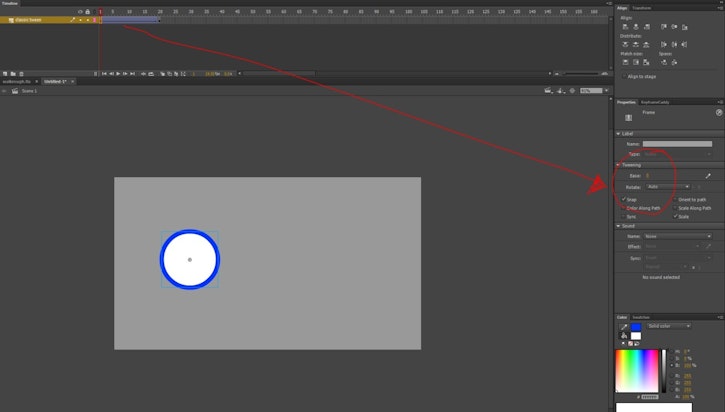
Beside the word Ease is a number input. It’s this input that determines how much of an ease in or out you need for your animation. The range is -100 to +100.
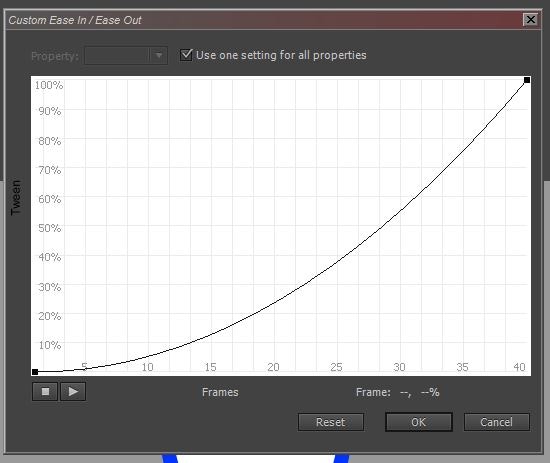
-100 is an ease in where the animation sloooowly picks up speed (fig. a)
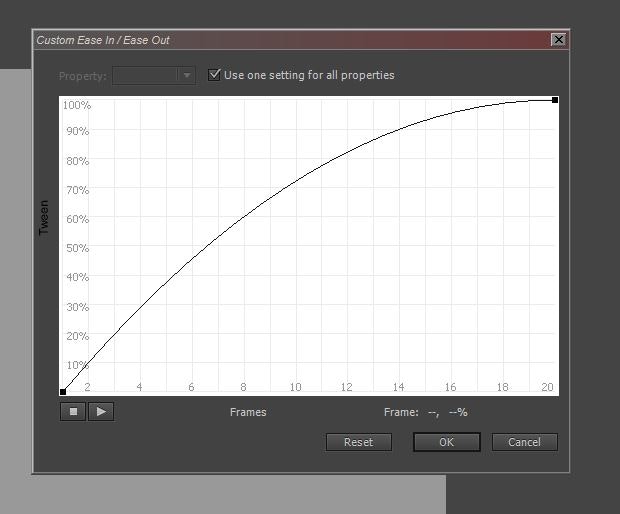
+100 is an ease out where the animation comes to a sloooow halt (fig. b)
‘So what if I want both an ease in and an ease out’, the fervent among you ask. The answer?
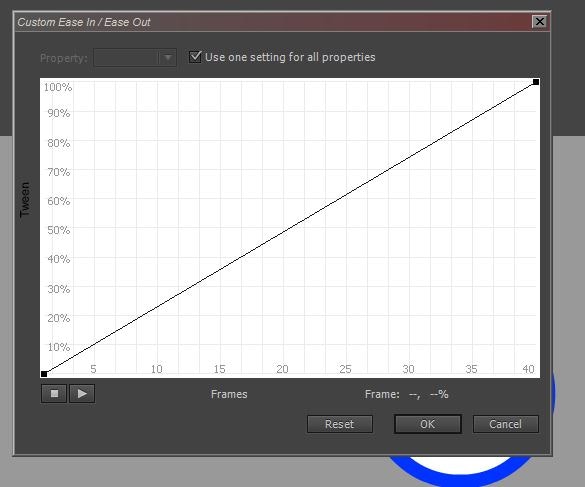
Curves!! Click the pencil looking button in the tweening panel (see below):

(fig. c) No ease curve
(fig. d) Ease in Curve
(fig. e) Ease Out Curve
(fig. f) Ease in and Ease Out Curve
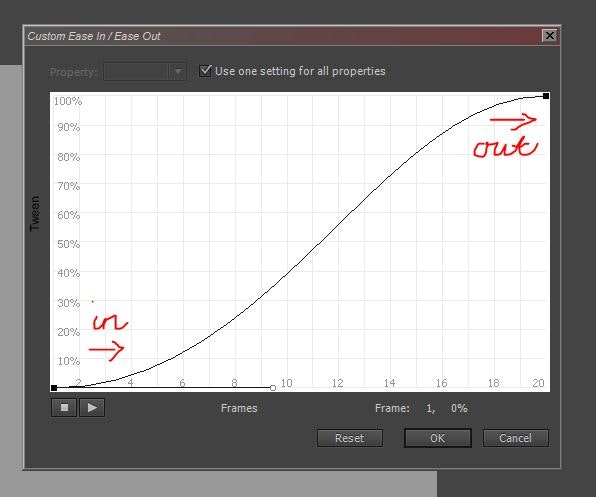
You can achieve the Ease In/Ease Out curve shown in (fig. f) by clicking the keyframes (represented by the black dots) and dragging the handles out to create a nice smooth curve. It’s a good idea now to play around with curves and look at how your animation is affected. A solid understanding of easing will help you greatly with the timing of your animations whether it’s a ball rolling to a stop or a character jumping in the air.
Advanced Symbols 2.
Instancing and looping
In the first tutorial I covered the concept of timelines within symbols. Instancing and looping is a step up from that and one of the most important elements of animating in flash to get a grasp on.
The basic concept behind instancing and looping is whereby you have a symbol with animation occurring inside of it. Instancing allows you to choose where that inner animation begins from outside of that timeline. I’ll go through a step by step example to help understand it.
1. Create a new document and give your timeline 40 frames length (select frame 40 in the timeline and hit f5 to add frames)
2. Create a circle, select it and turn it into a symbol (F8). It’s important to note at this point that when the dialogue box pops up, ensure that it’s set to “graphic”. Hit OK to create the symbol
3. Double click your new symbol to go inside it’s timeline.
4. Add 40 frames to this new timeline.
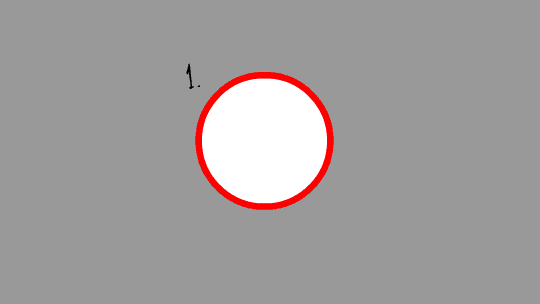
5. At frame 1, draw the number 1 with the brush tool. Then add a keyframe on frame 10 (F6). Delete the ‘1’ you just drew and draw the number 10. Do the same for frames 20, 30 and 40, drawing the numbers on each frame. When you hit enter or scrub the time line you should end up with something like below.
(fig. g)
6. Double click anywhere in the empty part of the stage to “go up a level” to the main timeline.
When you hit enter or scrub the timeline the animation inside the circle will play even though there is no animation on the main timeline. So let’s add some.
7. On frame 40 in the main timeline add a keyframe (F6) and move your circle anywhere on your stage. Then like before, right click on the timeline between your 2 keys and select create classic tween.
So what we have now is the animation on the main timeline controlling the movement of your symbol and inside that symbol is the timeline with the keyframes changing those numbers.
**What is happening here in the background is that Flash is getting information from the symbol’s first keyframe. As soon as the timeline rolls over or begins on a keyframe it tells the symbol to play whatever is inside. By default it’s told to play from frame 1 of the inner timeline. This is controllable.**
8. On the main timeline, at frame 1, select your symbol. Now within the properties panel (where we found the tweening sub panel earlier) There is a sub-panel named “Looping” (see fig. h)
(fig. h)
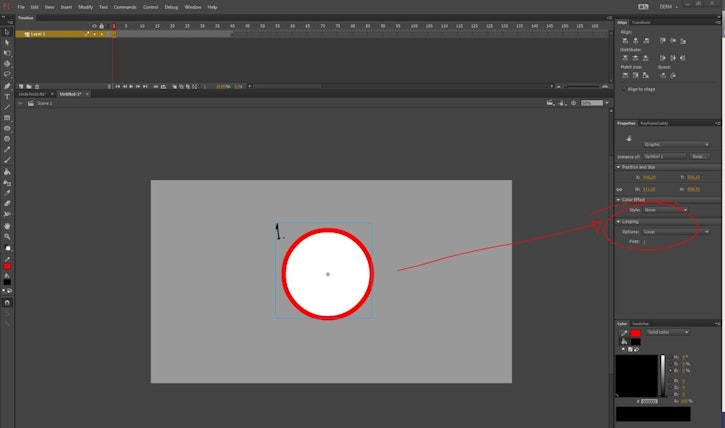
8. In the Looping panel change the “first” value to 10. Notice anything?
By changing the value here, what we are doing is telling flash to play the inner timeline of that symbol to play at frame 10 instead of the default frame 1. Try again with 20, 30 & 40.
This is instancing the frame of the inner timeline.
9. Ok now drop a new keyframe on frame 15. Select your symbol and in the looping panel change the value to 1, 10, 20, 30 or 40. Now when you scrub the time line or hit enter you should see that as soon as the timeline hits that keyframe it changes the play point of the inner timeline to the number you’ve told it to play from.
10. Delete the key at frame 15 now. Go back to frame 1, select the symbol and change the value in the Looping panel to 1 again.
11. Now in your timeline go to frame 60 and hit F5 to add more frames. Now hit enter. Notice that once the timeline gets to frame 41 it changes back and plays from 1 again. This is because by default when a keyframe instances the timeline of a symbol, not only is it set to frame 1 but it is also set to “Loop”.
13. Let’s change that. Go to frame 1 and select your symbol. Head over to that looping panel again and in the drop down menu set to “loop” change it to single frame. By setting it to single frame you’re basically telling the symbol that you only want the inner timeline to stop at a specific frame.
14. Now change the dropdown to play once. As you may have expected it will play the inner timeline only once then come to a stop.
Right now, as we deal with crude number changes in that inner timeline, you may feel like this is an exercise in futility but I assure you when you get into the depths of character animation where you have a symbol of a head which inside has a symbol of a mouth which has all of the various mouth shapes you need to animate to a dialogue track; It’s very necessary. We will come to all that eventually in this series.
Diarmuid Donohoe
Senior 2D Visual Development Artist
We Love Animation®
Brown Bag Labs is an exciting online space, brought to you by Brown Bag Films. We share great content for families as well as behind the scenes fun and tutorials from the Brown Bag Films team.
Get our great newsletter!
Get our great newsletter!