
Flash Animation Tutorial #Part1
- Tutorials
- Kids & Families
- Posted by Diarmuid Donohoe on December 16 2015
Share Tweet
In this series of tutorials I will go through the basics of the Flash interface and tools, the basic concepts of nested animation and ultimately a walk cycle from start to finish. I will be using Flash CC 2014 but the basic concepts such as keyframes, tweens, eases, symbols and instancing, transcend each version of Flash over the past six years or so.
Animation basics
1. New Document: When opening a new document you will see the various options. Generally for animation I leave all values alone, except for the Width/Height, which I set to 1920x1080, the frame rate, which depends on the project, but for now I’ll keep at 24, and the background colour. I prefer to work on a grey background but choose whatever suits you.

2. Interface: Once you open the new document, you will see a lot of panels. For now though, we will concentrate on 3 of these; the timeline, the stage and the tool panel. See the image below and become familiar with them:

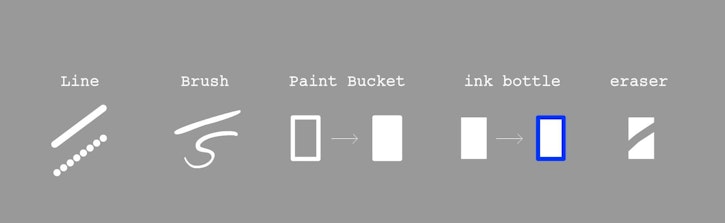
3. Tools: The main tools we'll be using are the brush tool, the line tool, the paint bucket tool, ink bottle tool and the eraser. Usually, when animating, I use the brush & eraser tools to sketch out rough poses and inbetweens, then once happy I will use the line and bucket tools to create finished drawings. We’ll come to all of that later.
For the purposes of explaining the basics I will also use the ‘Oval tool’ to draw circles.
4. Strokes and fills: There are 2 types of graphical elements when drawing in flash. Strokes and fills. Think of them as the outlines and the bits coloured in. That may be a simplified description but once you get playing with lines and fills you will quickly see how they work. Try this; use the Oval tool to create a circle or elipse. By default it will be an outline with the centre filled in. Now select the filled part and delete it. What remains is the stroke. Now use the bucket tool to fill it again. Now delete the outline. What remains is the fill. It’s important to get the gist of this so play around with it.
5. Stage: The stage is where we will draw everything we need for our animations. Characters, Backgrounds and effects are all created here. Anything that exists outside of the stage will not be visible when exporting your movie.
6. Timeline: The timeline is the panel from which we will be able to see the amount of frames we have in our animation, the positioning and distance between our main drawings (keyframes), the various layers we use for rough drawings, and various elements and the ‘tweens’ between keyframes. But more on that later.
Symbols Part 1. Nested Timelines
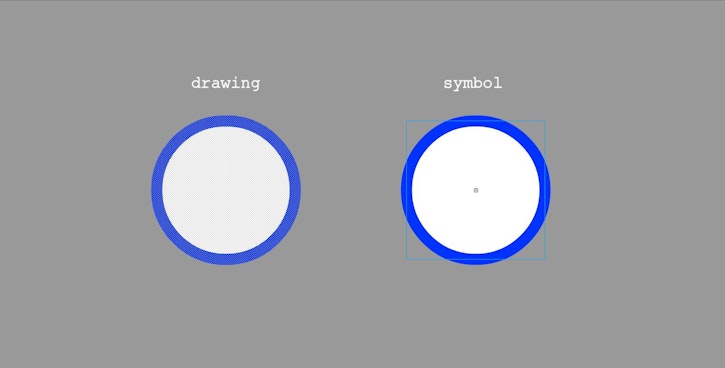
To fully explain symbols I will need to first define what a ‘drawing’ is. It sounds silly but in Flash knowing the difference between a drawing and a symbol will save a lot of heartache down the line. A ‘drawing’, put simply, is raw graphics on the stage that have been created using any of the drawing tools, such as the line tool, oval, brush, rectangle etc. It can be erased with the eraser, added to manipulated and ultimately is the core of your animation.
A symbol on the other hand, is created from a drawing as a container for the drawing. It can’t be added to or manipulated in the same way as a drawing. Think of it as placing an apple in a box (bear with me). Before placing it in the box, it’s edible, squashable etc. Once placed in the box it’s still there as an apple but you can no longer manipulate it in the same way. But now you can do things to the box that you could not with the apple, and yet the apple stays the same. Sounds weird? It’s about to get weirder.
Do the following:
- Create 2 circles on the stage.
- Select one of them (using the selection tool)
- Hit the F8 key
- You’re about to turn that drawing into a symbol - give it a name & hit ok.
- Congrats, you’ve created a symbol. Notice the blue box around the circle.
- Before I go on. I need you to go to the timeline and double click the layer where it says Layer 1. Re-name it Outer Timeline.
- Now the cool stuff; double click your new symbol. Notice anything different? Your newly changed layer is back to layer 1, one of your circles is grayed out and the other is back to being a regular ol’ drawing. This is because you are now inside the symbol (or using my earlier analogy, you’re inside the box with the apple).
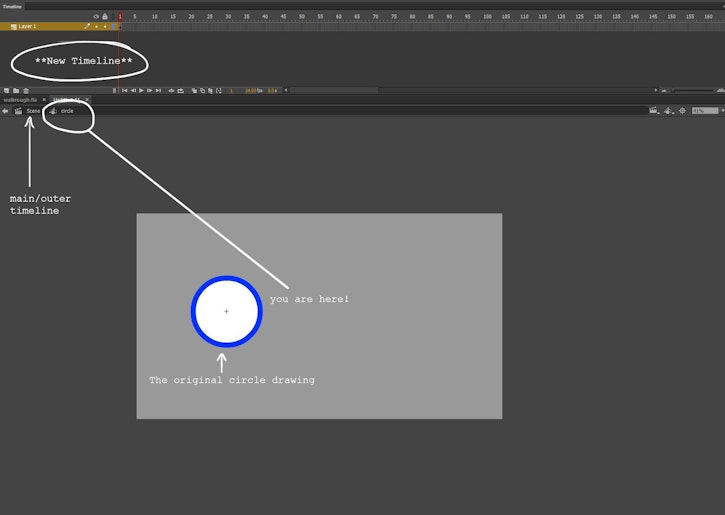
- Inside the symbol, you now have a brand new timeline, separate but inside the main timeline where you first created your circles. This is important stuff to understand because what this means is that you can create animation inside animations.
- Now I want you to manipulate the circle drawing somehow. Use the eraser tool or brush or line and change it in some way.
- Once you’ve done this. Double click anywhere away from your drawing on the stage. This will now bring you back to the main timeline. Notice the layer you had changed earlier and the changes you made to your circle inside the symbol remain.
Symbols Part 2. Tweening
Ok. Let's get down to some animating.
Create a new document by going to File-New or hit Ctrl + N. Choose your stage dimensions and colour and hit ok. Create a circle as before using the oval tool. Now select the new circle and hit the F8 key to convert the drawing into a symbol.
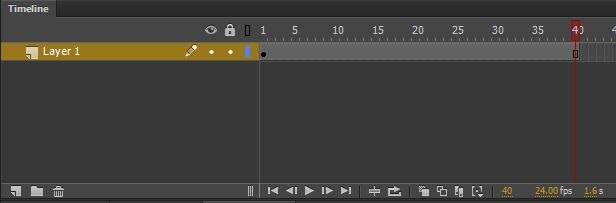
In the timeline, go to frame 40 and hit the F5 key. What this does is add frames (not keyframes) to the timeline. This is how long your animation will be. Hit enter and watch the slider traverse the new frames you have created.
Now for Keyframes. A Keyframe is essentially a selected frame on which the drawing or symbol changes. To illustrate this go to frame 20 and hit the F6 key. This will place a new keyframe on that place on your timeline.
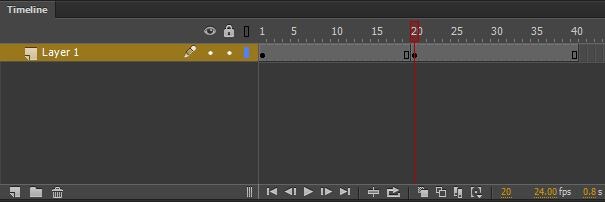
While on frame 20, go to your circle symbol and move it anywhere on the stage. Now if you hit enter or scrub the timeline you will see that once the timeline reaches frame 20 it changes to the new position.
Now this one will be used a lot from now on; Right click in the area between the two keyframes in the timeline and select create classic tween. The area should go blue. What this does is fill in the gaps in the positions of each keyframe. Hit enter or scrub the timeline. You should have something similar to the image below:

Now you can drag the second keyframe anywhere in your timeline to adjust its speed.
That's it for now! My next tutorial will cover more animation principles and show you how to get started with characters!
Diarmuid Donohoe
Senior 2D Visual Development Artist
We Love Animation®
Brown Bag Labs is an exciting online space, brought to you by Brown Bag Films. We share great content for families as well as behind the scenes fun and tutorials from the Brown Bag Films team.
Get our great newsletter!
Get our great newsletter!